Install and Configure Squid with SSL-Bump on CentOS7 ,Restrict Domain and URL access with SquidGuard and Analyze it all with SquidAnalyzer:
For some reasons you may want to have an idea of what’s happening around you. It could be in a corporate setup and you are the network admin and you just want to have an idea of what your users are up to. Or maybe it’s sort of a policy.
In other cases it could be for fun like in my case where by you have given a number of your neighbors Free Access to WiFi. But you decide let it not be just free. Why don’t they ‘give’ you some ‘dummy’ data for ‘personal’ use after all you are giving them free internet access for ‘personal’ use.
Whichever the case let’s look at how we can setup Squid (A very powerful caching proxy) to help us monitor web access as well as restrict access where need be.
Setting up transparent Squid proxy for caching and access restriction is trivial but only if we are dealing with HTTP/FTP traffic only. Fortunately or unfortunately this is not the case. As of this date the biggest percentage of web traffic is encrypted (https://transparencyreport.google.com/https/overview).
This is a good thing but again it poses another challenge. What about encrypted attacks ? There are many of them out there if not all. This means IDS/IPSes will miss these attacks. What about the monitoring ? how do you get to monitor your users if they are sending data through an encrypted channels ?All the above questions have been addressed mostly so let’s go straight to our setup.
When looking up “Setting up Squid with SSL Bump” most of the guides seemed to fail for some reason or another, Others were sort of incomplete in one way or another. The aim of this guide is put together a working example borrowing from different guides that I found to be working so kindly note that this is not 100% done from scratch but bits of information from different sources all listed at the bottom.
Step 1: Install CentOS 7 minimal
The ISO file can be downloaded from your nearest mirror check this link:
Note: After install run
#yum update
Step 2: Install and configure Squid with SSL Bump.
Note: Remember to change a number of things to fit your setup i.e the network interface cards.
This setup assumes two interfaces – One external connected to ISP and one internal for LAN users. For any deviation please change steps appropriately.
[1]Install squid on you CentOS installation.
#yum -y install squid
[2]Create CA certificate and key for SSL bump
#cd /etc/squid
#mkdir ssl_cert
#chown squid:squid ssl_cert
#chmod 700 ssl_cert
#cd ssl_cert
#openssl req -new -newkey rsa:2048 -sha256 -days 365 -nodes -x509 -keyout myCA.pem -out myCA.pem
[3] Then extract certificate for importing in browsers
#openssl x509 -in myCA.pem -outform DER -out myCA.der
[4] Disable SELinux
#setenforce 0
Note: Also edit ‘/etc/sysconfig/selinux’ appropriately. (Very well explained)
[5] Generate DH parameters in ‘/etc/squid’ folder
#openssl dhparam -outform PEM -out dhparam.pem 2048
[6] Edit ‘/etc/squid/squid.conf’ and use following before ‘http_access deny all’ rule:
#Enable quick shutdown
shutdown_lifetime 0 seconds

#Enable transparent proxy with SSL bump
http_port 3126 intercept
https_port 3127 intercept ssl-bump generate-host-certificates=on dynamic_cert_mem_cache_size=16MB cert=/etc/squid/ssl_cert/myCA.pem
http_port 3128 ssl-bump generate-host-certificates=on dynamic_cert_mem_cache_size=16MB cert=/etc/squid/ssl_cert/myCA.pem

#Configure SSL Bump for all sites
acl broken_sites dstdom_regex xyzbank.com
acl monitor_domains dstdom_regex youtube.com facebook.com ytimg.com googlevideo.com ggpht.com
acl monitor_domains2 dst 216.58.196.110 216.58.199.174 #youtube connect works over IP
ssl_bump none localhost
ssl_bump none broken_sites #Avoid bumping financial sites such as banks
ssl_bump server-first monitor_domains #Bump facebook and youtube
ssl_bump server-first monitor_domains2 #Since youtube bump fails with just domain also add youtube serverIP

#Configure hostname
visible_hostname squidx.somewhere.com

#Configure logging of query terms
strip_query_terms off #This will allow checking which youtube URLs were visited by user
[7] Initialize SSL certificate directory
#/usr/lib64/squid/ssl_crtd -c -s /var/lib/ssl_db
#chown -R squid:squid /var/lib/ssl_db/
[8] After this try starting squid
#systemctl start squid
#systemctl status squid
#systemctl enable squid
Note: You can ignore SELinux warnings related to certificate access to /var/lib/ssl_db if any
[9] Enable IP forwarding
#sysctl net.ipv4.ip_forward=1
[10] Create file ‘/etc/sysctl.d/ipv4_forward.conf’ with following contents:
net.ipv4.ip_forward = 1
[11] Labels interface internal and external appropriately by appending ‘ZONE=internal’ or ‘ZONE=external’ in ‘/etc/sysconfig/network-scripts/ifcfg-‘ files.
[12] Set zones and verify settings:
#systemctl restart network
#firewall-cmd –get-active-zones
[13] Configure firewall rules for allowing access to incoming ports
#firewall-cmd –zone=internal –add-port=3126/tcp –permanent
#firewall-cmd –zone=internal –add-port=3127/tcp –permanent
#firewall-cmd –zone=internal –add-port=3128/tcp –permanent
[14] Use direct interface of firewalld to configure port redirection. Edit file /etc/firewalld/direct.xml and put the below text
Note: make sure you use your interface here

Replace internal interface name after “-i” in above XML file
[15] Enable and verify direct rules using:
#firewall-cmd –reload
#firewall-cmd –direct –get-all-rules
[6] Enable masquerade
#firewall-cmd –permanent –zone=external –add-masquerade
#firewall-cmd –reload
#firewall-cmd –zone=external –list-all
[7] Configure a browser with proxy:3128 and HTTP/HTTPS browsing should work.
Verify that logs in /var/log/squid/access.log are getting updated.(just tail and follow with -f)
Done! Squid should be up and running and able to access all the sites both HTTP and HTTPS
Step 2: Restricting Access with SquidGuard:
[1]Installing SquidQuard:
In order to install SquidGuard from the repositories we need to use external repositories
to install do the following.
# yum -y install yum-plugin-priorities
Then we need to set [priority=1] to official repository
# sed -i -e “s/\]$/\]\npriority=1/g” /etc/yum.repos.d/CentOS-Base.repo
Lets install the EPEL repository which is provided from Fedora project.
# yum -y install epel-release
We can set the priority to 5 [priority=5]
# sed -i -e “s/\]$/\]\npriority=5/g” /etc/yum.repos.d/epel.repo
We can also disable it by default and only enable it if we need it during package installation This we will do by simply changing from enabled=1 to enabled=0 in “/etc/yum.repos.d/epel.repo”
# sed -i -e “s/enabled=1/enabled=0/g” /etc/yum.repos.d/epel.repo
Now we go straight and install SquidGuard from the EPEL repo.
# yum –enablerepo=epel -y install squidGuard
[2]Backup the config file and create a new one.
# mv /etc/squid/squidGuard.conf /etc/squid/squidGuard.conf.bak
# vi /etc/squid/squidGuard.conf
And put this content.
dbhome /var/lib/squidGuard/db
logdir /var/log/squidGuard
# define 'deny' category

dest deny {
# define prohibited domain list in 'deny' category

domainlist deny/domains
# define prohibited URL list in 'deny' category

urllist deny/urls
}
acl {
default {
# permit all except 'deny' category

pass !deny all
# the redirected URL if matches 'deny'
redirect http://127.0.0.1/error.html
}
}
Let’s create a directory where we will put all our restricted URLs and Domains.
# mkdir -p /var/lib/squidGuard/db/deny
# vi /var/lib/squidGuard/db/deny/domains
Then we write down all the domains we would like to prohibit to access to
google.com
amazon.com
If you have some specific URLs you need to add them on the url text file as shown below
# vi /var/lib/squidGuard/db/deny/urls
https://www.facebook.com/pages/creation/?ref_type=registration_form

https://anyother.domain/pages/you/want/to_deny/access.to
All is now done we need to tell SquidGuard to generate a DB with our new denied domains and URLs.
# squidGuard -C all
we change the ownership of the folder to our Denied URLs and Domains
# chown -R squid. /var/lib/squidGuard/db/deny
We are done with SquidGuard now. But wait our Squid installation will just let everything pass through unless we tell it otherwise.
So we go a head and edit Squid Config File and add the url_rewrite_program option.
# vi /etc/squid/squid.conf
add the following to the end
url_rewrite_program /usr/bin/squidGuard -c /etc/squid/squidGuard.conf
You can now restart squid
# systemctl restart squid
That’s all. to test our domain/URL block just visit http://www.google.com and it should fail. and re-direct you to http://127.0.0.1 (This can be changed if you wish).
Note: In this example we have used just two domains for demonstration. For a more practical blacklisting check out http://www.squidguard.org/blacklists.html
That’s all well said and done but would it not be better if we can visualize what is happening ? Let’s lastly look at SquidAnalyzer.
Step 3: Install SquidAnalyzer:
Let’s create a folder,download SquidAnalyzer and install it.
#mkdir /opt/squidanalyzer
#cd /opt/squidanalyzer
#yum install gd make libpng perl-ExUtils-MakeMaker perl-GD-Graph perl-GD-Graph3d perl-TimesHiRes
We will also need build tools and perl dev
#yum group install “Development Tools”
#yum install perl-devel
Now we Download the file and install:
#wget https://tenet.dl.sourceforge.net/project/squid-report/squid-report/6.6/squidanalyzer-6.6.tar.gz
#tar -zxvf squidanalyzer-6.6.tar.gz
#cd squidanalyzer-6.6
#perl Makefile.PL
#make
#make install
Now go ahead and back up the original config file
#cp /etc/squidanalyzer/squidanalyzer.conf /etc/squidanalyzer/squidanalyzer.conf.bak
Edit config file to reflect what we want… The most important options are shown below.
#vi /etc/squidanalyzer/squidanalyzer.conf
# Path where SquidAnalyzer should dump all HTML and images files.
# Choose a path that can be read by a Web browser
Output /var/www/html/squidanalyzer

# The URL of the SquidAnalyzer javascript, HTML and images files.
## WebUrl /squidreport
WebUrl /squidanalyzer

# Set the path to the Squid, squidGuard and/or ufdbGuard log files
## LogFile /var/log/squid/access.log
LogFile /var/log/squid/access.log
With the above three we should be good to go.
We also need to edit network-aliases of SquidAnalyzer to reflect our network in case you are using VirtualBox host only default is(192.168.56.0)
#vi /etc/squidanalyzer/network-aliases
#
# See examples below.
#
#——————————————————————————-
#Home Network 192\.168\.1\.
#Associated Networks ^10\.169\.[2-4]\.,^10\.169\.[7-9]\.
#ClassB Network 10.172.0.0/16
#ClassC Network 192.168.1.0/24
Custom Network 192.168.56.0/24
That’s all with SquidAnalyzer install and configuration. Now by default there is nothing to view. in order to get our data analyzed we need to run SquidAnalyzer so as it can populate the folders with web based content. We will do this by running the below command.
# /usr/local/bin/squid-analyzer
This should take a few seconds depending on the number of squid log you have.
it is important to note that SquidAnalyzer will not populate the dashboard/interface with new data unless you run it. So to automate this you can simply create a cron job to be doing this either daily, hourly or as you wish. for example
vi /etc/crontab
# SquidAnalyzer log reporting daily
0 2 * * * root /usr/local/bin/squid-analyzer > /dev/null 2>&1
The above will make squidanalyzer run daily and create new visuals for access via browser.
Now if you look up few lines above on the SquidAnalyzer, you will notice the below options.
Output /var/www/html/squidanalyzer
WebUrl /squidanalyzer
This is basically the webroot folder and the exact URL you will need to access to use squidanalyzer. This simply suggests that a web server of sort is needed.
So lets go with Apache(httpd)
Installing httpd is trivial. We will use 80/TCP(default)
# yum -y install httpd
Open the welcome page and comment out everything (You an also remove it completely but it will be created in case you upgrade)
#vi /etc/httpd/conf.d/welcome.conf
or
# rm -f /etc/httpd/conf.d/welcome.conf
Configure httpd and change the DocumentRoot to “/var/www” or to match your own environment.
# vi /etc/httpd/conf/httpd.conf
Finaly restart httpd and enable start at boot time.
# systemctl start httpd
# systemctl enable httpd
That’s it.
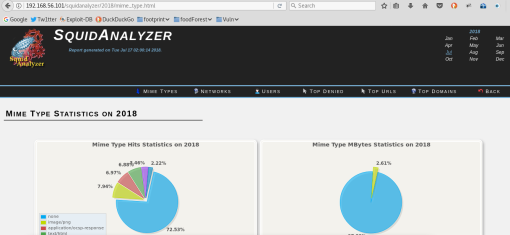
Visit http://yourproxyIP/squidanalyzer and enjoy. You should have this sort of view but of course depends on the number of logs you got.
Note: This page can be password protected with .htacces just search for ‘apache protect with htaccess’
Reference:


